IGT:Image Transfer
Contact: Mark Anderson
Pushing images from scanners to SPL (DICOM)
This is a good way for researchers to get their data to the SPL after a scan has been done. Most of the scanners have been configured to allow images to be sent to the SPL. The user name of the sender of the images is recorded to maintain HIPAA compliance. At the scanner select either LISA or SPL as the DICOM destination and transfer the images. Data will be sent to the directory /spl/tmp/incoming. If there is a lot of data in /spl/tmp/incoming it may take a while to locate your particular case. One method is to find timestamps on files in /spl/tmp/incoming that match the time that the images were transferred from the scanners or see [#f Finding DICOM data in /spl/tmp after it has been transferred)] If non-clinical scans are not transferred to the SPL or stored on MOD, there is a good chance the data will be deleted unless a prominent note is left for the techs and they are reminded not to delete the data. Clinical cases are archived and can be restored via the following method.
Restoring images from PACS from 09/1998-present (DICOM)
This is the best way to get all CT and MR images from September 1998 to present that are not on the scanners. Data can be sent to SPL directly to /spl/tmp/incoming from any of the IMPAX systems in the reading rooms or from a web-based IMPAX service tool. Send email to mark@bwh.harvard.edu
or  marianna@bwh.harvard.edu
to get cases transferred via this method. If you plan to use this method frequently, you may want to get your own BICS account with transfer privileges by calling the help desk at x2-5927
Finding DICOM data in /spl/tmp/incoming after it has been transferred
The easiest way to find your DICOM data is to point your browser to /spl/tmp/incoming/ and look for a file with a name beginning with
DICOM_files_as_of
The file name will contain a time stamp and look similar to the filename below.
DICOM_files_as_of:12_30_04_at_14:10:28.html
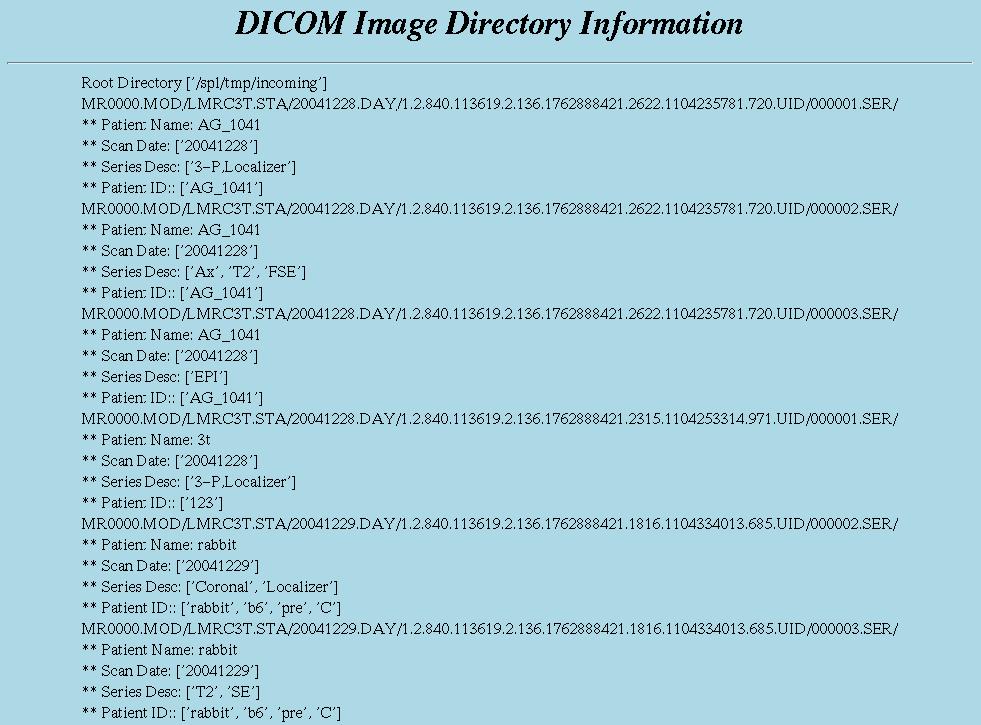
This file is updated every hour on the hour with a list of the current contents of /spl/tmp/incoming/ and the time that the file was updated is part of the file name. The above file shows the contents of /spl/tmp/incoming as of Dec 30 2004 at 2:10 in the afteroon. After clicking on the DICOM html you will see information similar to the following which should help you to locate your data. One way to use the page similar to the one below is to do the following:
   * open a command window and change to the Root Directory in the window (e.g cd /spl/tmp/incoming)
   * load the DICOM_files_as_of:**********.html page into your browser
   * use the edit->Find in This Page tab of the browser and type in the Patient ID or Patient Name. If you get the Alert message "The text you entered was not found." Then either you have entered the incorrect information or you will need to wait until the page is updated on the next hour.
   * If your Patient Name or Patient ID is found in DICOM html then cut and paste from the DICOM html page the path above the Patient Name or Patient ID pointing to where your data is located and change to that directory(e.g. cd MR0000.MOD/LMRC3T.STA/20050623.DAY/1.2.840.113619.2.136.1762888421.2231.1119526620.0.UID/)
   * from this directory, copy your data to a safe place as it will be deleted 1 week after it is last accessed
Below is an example of how the directories might be organized in /spl/tmp/incoming:
./MR0000.MOD/BWOW1.STA ./MR0000.MOD/BWOW1.STA/20040609.DAY ./MR0000.MOD/BWOW1.STA/20040609.DAY/1.2.840.113619.2.5.1762874864.1706.1086778760.584.UID ./MR0000.MOD/BWOW1.STA/20040609.DAY/1.2.840.113619.2.5.1762874864.1706.1086778760.584.UID/000001.SER ./MR0000.MOD/BWOW1.STA/20040609.DAY/1.2.840.113619.2.5.1762874864.1706.1086778760.584.UID/000002.SER ./MR0000.MOD/BWOW1.STA/20040609.DAY/1.2.840.113619.2.5.1762874864.1706.1086778760.584.UID/000003.SER ./MR0000.MOD/BWOW1.STA/20040609.DAY/1.2.840.113619.2.5.1762874864.1706.1086778760.584.UID/000005.SER ./MR0000.MOD/BWOW1.STA/20040609.DAY/1.2.840.113619.2.5.1762874864.1706.1086778760.584.UID/000006.SER ./CT0000.MOD ./CT0000.MOD/BWCTPIKE.STA ./CT0000.MOD/BWCTPIKE.STA/20040610.DAY ./CT0000.MOD/BWCTPIKE.STA/20040610.DAY/1.3.12.2.1107.5.1.4.28154.4.0.4973204933331248.UID ./CT0000.MOD/BWCTPIKE.STA/20040610.DAY/1.3.12.2.1107.5.1.4.28154.4.0.4973204933331248.UID/000002.SER
The following describes the hierarchy of the directories (we will use the CT0000.MOD directory above as an example)
   * CT0000.MOD this is the modality usually either CT or MR for most SPL data
   * BWCTPIKE.STA this is the StationName where the image was transferred from.
   * 20040610.DAY The date of the scan. This scan was done on June 10, 2004.
   * 1.3.12.2.1107.5.1.4.28154.4.0.4973204933331248.UID This annoyingly long string is called the StudyInstanceUID and it uniquely identifies this study. This string does not provide much useful information to most users. The beginning part of the string (1.3.12.2.1107.5.1.4) is the Implementation Class UID and identifies the images in this directory as coming from a Siemens scanner.
Software Available for Sharing
The software used here is comprised of three main parts:
1) A proprietary DICOM listener that recieves the data. We have a licence for this from the Dejarnette Corporation, this is not sharable.
2) print_header program that gleans information from DICOM image headers. This is our software and is available for sharing and runs on Solaris and Linux.
3) A series of shell and python scripts that collect the image information and generate a web page describing the data. This software is very specific to our site and likely not useful elsewhere.
