Difference between revisions of "Image Registration for MRg Prostate Biopsy"
| Line 4: | Line 4: | ||
While using this code, please remember that it can change at any time, as I (Andrey Fedorov) am working to evaluate and improve it. It has not been evaluated for organs other than prostate. I will be interested to learn about your experience using it for new applications. | While using this code, please remember that it can change at any time, as I (Andrey Fedorov) am working to evaluate and improve it. It has not been evaluated for organs other than prostate. I will be interested to learn about your experience using it for new applications. | ||
| + | |||
| + | '''Please treat all the training data provided to you for testing as non-public. You MUST check with me or with Dr. Noby Hata before you copy the data outside the SPL network or use it in any publication!''' | ||
== General instructions == | == General instructions == | ||
Revision as of 14:44, 17 September 2010
Home < Image Registration for MRg Prostate BiopsyIntro and Disclaimer
BRAINSFitIGT code is a 3D Slicer module based on the BRAINSFit code originally developed by Hans Johnson and his team at U.Iowa. BRAINSFitIGT has been modified and customized to support registration of prostate preoperative MRI to intraoperative MRI during image-guided biopsy procedures. It has been used to produce reasonable registration results for the last 7 or so biopsy cases. Quantitative evaluation of the accuracy is in progress.
While using this code, please remember that it can change at any time, as I (Andrey Fedorov) am working to evaluate and improve it. It has not been evaluated for organs other than prostate. I will be interested to learn about your experience using it for new applications.
Please treat all the training data provided to you for testing as non-public. You MUST check with me or with Dr. Noby Hata before you copy the data outside the SPL network or use it in any publication!
General instructions
- The software components used in this pipeline are not available in the standard Slicer distribution. Instead, the following binary available on opel.bwh.harvard.edu should be used:
/workspace/fedorov/Slicer/Stable-Release/Slicer3-superbuild/Slicer3-build/Slicer3
- log on to opel with X forwarding enabled:
ssh -XY opel
- the code is also available on the cart workstation at SPL. Log in using "develop" account (email me fedorov AT bwh) if you need the password. Use the Slicer icon on the desktop to launch Slicer with BRAINSFitIGT.
- You are supposed to be familiar with 3D Slicer. If this is not the case, familiarize yourself at least with the tutorials 1, 2, 4 and 5 from Slicer 3.6 training page
WARNINGS
Do not's ...
- do not make slice visible in 3D viewer: this will crash Slicer (this is a known problem specific to SPL fat nodes, there is no solution to fix it right now)
- do not use your home directory for Slicer temporary storage -- it will fill up quickly, and Slicer will not work correctly
Processing Steps
|
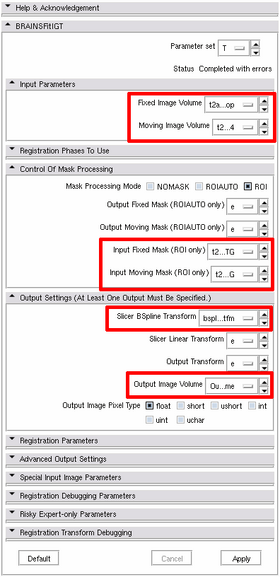
1. Preparation step: start Slicer, load the images (let's say, they are called "preop.nrrd" and "intraop.nrrd"). Do the following:
2. Registration step
|
Testing Data
Example datasets of prostate MRI acquired before and during Mr-guided biopsy procedures are available on the cart workstation at SPL:
- load a training dataset by clicking on File --> Load Scene... --> Prostate_registration_training
- there should be three training datasets: Case003, Case 004. Case005
- choose e.g. Case004/RegistrationScene.mrml
- nomenclature:
- t2ax = preoperative prostate image data
- t2ax-intraop = intraoperative prostate image data
The same training data is also available on SPL network in /projects/igtcases/ProstateBx_cases/Training/
