Difference between revisions of "Projects:RegistrationLibrary:RegLib C09"
From NAMIC Wiki
| Line 46: | Line 46: | ||
=== Methods === | === Methods === | ||
*place SPGR in background and fMRI in foreground. Review initial misalignment. | *place SPGR in background and fMRI in foreground. Review initial misalignment. | ||
| − | *if there is little or no initial overlap, go to the [http://www.slicer.org/slicerWiki/index.php/Modules:Volumes-Documentation-3.6 Volumes module], select the ''Info'' tab and click the ''Volume'' button. Repeat for both images. This should roughly center the volumes in the same physical space. Alternatively, when loading the data, consider checking the box for "Centered'' in the "Open File" dialog | + | *if there is little or no initial overlap, go to the [http://www.slicer.org/slicerWiki/index.php/Modules:Volumes-Documentation-3.6 Volumes module], select the ''Info'' tab and click the ''Center Volume'' button. Repeat for both images. This should roughly center the volumes in the same physical space. Alternatively, when loading the data, consider checking the box for "Centered'' in the "Open File" dialog |
*'''Phase 1: BRAINSfit rigid w/o masking''' | *'''Phase 1: BRAINSfit rigid w/o masking''' | ||
#open the Registration / [http://www.slicer.org/slicerWiki/index.php/Modules:BRAINSFit BRAINSfit module] | #open the Registration / [http://www.slicer.org/slicerWiki/index.php/Modules:BRAINSFit BRAINSfit module] | ||
| Line 52: | Line 52: | ||
##fixed image: SPGR; moving image: fMRI | ##fixed image: SPGR; moving image: fMRI | ||
##Registration phases: | ##Registration phases: | ||
| − | ###Initialize check: useGeometryAlign; check: | + | ###Initialize check: ''useGeometryAlign''; check: ''Rigid'' |
| − | + | ##Output: under ''Slicer Linear Transform'', select "create new" and rename to "Xf0_Rigid" or similar | |
| − | ##Output: under '' | ||
| − | |||
| − | |||
| − | |||
##leave rest at defaults | ##leave rest at defaults | ||
##click: ''Apply'' | ##click: ''Apply'' | ||
| − | *''' | + | *'''Phase 2: Nonrigid BSpline''' |
| − | # | + | #open the Registration / [http://www.slicer.org/slicerWiki/index.php/Modules:BRAINSFit BRAINSfit module] |
| − | ## | + | ##Select Preset "Xf1_BSpline" or set the parameters as shown below: |
| − | ## | + | ##fixed image: SPGR; moving image: fMRI |
| − | ## | + | ##Initialize with previous transform: select the above "Xf0_Rigid" |
| + | ##Output: under ''Slicer BSpline Transform'', select "create new" and rename to "Xf1_BSpline" or similar | ||
| + | ##Output: under ''Output Image Volume'', select "create new" and rename to "fMRI_Xf1" | ||
| + | ##Output Image Pixel Type: check box for "ushort" | ||
| + | ##Registration Parameters: Number of Grid Subdivisions: 7,7,5 | ||
| + | ##Maximum B-Spline Displacement: set to 3 [mm] | ||
| + | ##leave rest at defaults | ||
##Click: ''Apply'' | ##Click: ''Apply'' | ||
| − | # | + | #Return to ''Data'' module. To compare the different alignments, move the fMRI volume back under the rigid transform. BRAINSfit automatically places the moving volume into the result transform, but since nonrigid transformations cannot be visualized directly the orientation does not seem to change. For Nonrigid deformations a resampled volume must be produced to see the effect. |
| − | |||
| − | |||
| − | |||
| − | |||
| − | |||
| − | |||
| − | |||
| − | |||
| − | |||
| − | |||
| − | |||
| − | |||
| − | |||
| − | |||
| − | |||
| − | |||
=== Registration Results=== | === Registration Results=== | ||
Revision as of 14:30, 29 August 2011
Home < Projects:RegistrationLibrary:RegLib C09Back to ARRA main page
Back to Registration main page
Back to Registration Use-case Inventory
Contents
v3.6.3  Slicer Registration Library Case 09: Functional MRI aligned with structural reference MRI
Input

|

|
|
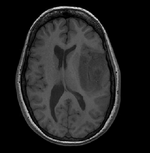
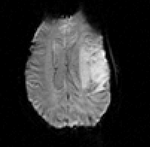
| Target Anatomical Ref. | fMRI |
Modules
- Slicer 3.6.1 recommended modules: BrainsFit
Objective / Background
This is a typical example of fMRI pre-processing. Goal is to align the fMRI image with a structural scan that provides accuracte anatomical reference. The fMRI contains acquisition-related distortion and low contrast to discern much anatomical detail. We also have pathology (stroke) with variable contrast across different MRI protocols.
Keywords
MRI, brain, head, intra-subject, fMRI
Input Data
- reference/fixed : T1 0.5 x 0.5 x 1 mm , 512 x 512 x 176
- moving: fMRI sequence of motor task (right hand clench) 2 x 2 x 4 mm, 128 x 128 x 19
Download
- download example data (Data,Presets, Solution, zip file 60 MB)
- download parameter preset file ( MRML file 12 kB)
Discussion: Registration Challenges
- the fMRI contains acquisition-related distortions that can make automated registration difficult.
- the fMRI contains low tissue contrast, making automated intensity-based registration difficult.
- the two images often have strong differences in voxel sizes and voxel anisotropy. If the orientation of the highest resolution is not the same in both images, finding a good match can be difficult.
- there may be widespread and extensive pathology (e.g stroke, tumor) that might affect the registration if its contrast is different in the baseline and structural reference scan
Discussion: Key Strategies
- this example manages to lock onto the target w/o masking, despite the FOV clipping. For similar cases it is likely that masking of the brain in both images may be necessary to obtain a good match.
- a good rigid alignment is important before proceeding to non-rigid alignment to further correct for distortions. Affine is not recommended w/o masking, because the FOV differences would incur large scaling distortions.
- The nonrigid portion should be constrained to a max. deformation, e.g. 3mm
Methods
- place SPGR in background and fMRI in foreground. Review initial misalignment.
- if there is little or no initial overlap, go to the Volumes module, select the Info tab and click the Center Volume button. Repeat for both images. This should roughly center the volumes in the same physical space. Alternatively, when loading the data, consider checking the box for "Centered in the "Open File" dialog
- Phase 1: BRAINSfit rigid w/o masking
- open the Registration / BRAINSfit module
- Select Preset "Xf0_Rigid" or set the parameters as shown below:
- fixed image: SPGR; moving image: fMRI
- Registration phases:
- Initialize check: useGeometryAlign; check: Rigid
- Output: under Slicer Linear Transform, select "create new" and rename to "Xf0_Rigid" or similar
- leave rest at defaults
- click: Apply
- Phase 2: Nonrigid BSpline
- open the Registration / BRAINSfit module
- Select Preset "Xf1_BSpline" or set the parameters as shown below:
- fixed image: SPGR; moving image: fMRI
- Initialize with previous transform: select the above "Xf0_Rigid"
- Output: under Slicer BSpline Transform, select "create new" and rename to "Xf1_BSpline" or similar
- Output: under Output Image Volume, select "create new" and rename to "fMRI_Xf1"
- Output Image Pixel Type: check box for "ushort"
- Registration Parameters: Number of Grid Subdivisions: 7,7,5
- Maximum B-Spline Displacement: set to 3 [mm]
- leave rest at defaults
- Click: Apply
- Return to Data module. To compare the different alignments, move the fMRI volume back under the rigid transform. BRAINSfit automatically places the moving volume into the result transform, but since nonrigid transformations cannot be visualized directly the orientation does not seem to change. For Nonrigid deformations a resampled volume must be produced to see the effect.
Registration Results
 unregistered
 after rigid registration
 after additional BSpline non-rigid registration
