Projects:RegistrationLibrary:RegLib C31
From NAMIC Wiki
Home < Projects:RegistrationLibrary:RegLib C31
v3.6.1
Back to ARRA main page
Back to Registration main page
Back to Registration Use-case Inventory
Contents
v3.6.1  Slicer Registration Library Case xx: TBI

Input
Modules
- Slicer 3.6.1 recommended modules: BrainsFit, Expert Automated Registration
Objective / Background
We seek to align two exams (acute baseline and follow-up) as well as all series within exams into a common space for direct evaluation of regional change.
Input Data
- inter-exam
- reference/fixed : T1_e1 baseline exam of acute TBI , 512 x 512 x 160 ; 0.5 x 0.5 x 1 mm voxel size, axial acquisition, RAS orientation.
- moving:T1_e2 follow-up exam of acute TBI , 512 x 512 x 160 ; 0.5 x 0.5 x 1 mm voxel size, axial acquisition, RAS orientation.
- intra-exam
Registration Challenges
- we have multiple nested transforms: each exam is co-registered within itself, and then the exams are aligned to eachother
- strong pathology (hemorrhage?) present at different amounts in the two exams
Key Strategies
- we first register the scans within each exam to the T1
- second we register the follow-up T1 scan to the baseline T1
- we then nest the first alignment within the second
Procedure
- Load & Center
- Load T1 MPRAGE datasets via Load Volume...
- volumes are note well centered, i.e. their physical origin defined in the image header differs; we therefore first center both images:
- Go to Volumes module, open Info tab
- From Active Volume menu, select each image in turn, then click the Center Image button
- note how Image origin changes for T1_e1 from 121,-97,-97 to 128,-128,-80 and for T1_e2 from 129,-106,-66 to 128,-128,-80
- now that both images have same center their initial misalignment can be seen by placing T1_e1 in the background and T1_e in the foreground and using the toggle-switch
- Align Exam 2 to Exam 1: T1 1st pass: unmasked
- Open Registration / BRAINSFit module
- To set all parameters from presets, from the ParameterSet menu, select "Xf1_e1_FLAIR-T1_unmasked", else choose settings below:
- Fixed Image: e1_T1, moving image: e1_FLAIR
- Registration Phases: select "Initialize with CenterOfHeadAlign", Include Rigid, "IncludeScaleVersor3D" and Include Affine
- Output Settings: under SlicerLinear Transform, select "Create New Linear Transform, then select Rename" and rename it to Xf1_e1_FLAIR-T1
- Registration Parameters: increase the Number of Samples field to 200,000
- Leave all other settings at defaults & Click: Apply. Registration should complete within ~ 30 seconds
- Go back to the Data module: you should see the e1_FLAIR image moved under the newly created transform
- Select "E1_T1" as background and e1_FLAIR as new foreground, toggle to see alignment
- you will notice a small but distinct residual translational misalignment, apparent on axial and sagittal slices. This likely arises from dominant edges of the skull. We rerun a 2nd pass with masks
- Align Exam 1: FLAIR 2nd pass: masked
- we obtain a mask for the moving image (e1_FLAIR) by sending the mask for the fixed image (e1_ICC) through the inverse of the above transform
- From File menu, select Add Data & reload a second copy of the above transform Xf1_e1_FLAIR-T1 and the labelmap "e1_ICC.nrrd"
- rename Xform to " Xf1i_e1_T1-FLAIR and the mask to "e1_FLAIR_mask"
- go to the Transforms module, select the Xf1i_e1_T1-FLAIR transform and then click on the Invert button
- go to the Data module and drag the node for "e1_FLAIR_mask" inside the transform node Xf1i_e1_T1-FLAIR
- right click on the Xf1i_e1_T1-FLAIR node and select Harden Transform. We now have an approximate mask for the moving FLAIR image.
- Open Registration / BRAINSFit module
- To set all parameters from presets, from the ParameterSet menu, select "Xf1c_e1_FLAIR-T1_masked", else choose settings below:
- Fixed Image: e1_T1, moving image: e1_FLAIR
- Registration Phases: select Include Rigid, "IncludeScaleVersor3D" and Include Affine. Make sure no initialization phases are selected.
- Output Settings: under SlicerLinear Transform, select "Create New Linear Transform, then select Rename" and rename it to Xf1c_e1_FLAIR-T1_masked
- Registration Parameters: increase the Number of Samples field to 200,000
- Control of Mask Processing tab: check "ROI" box,
- Input Fixed Mask, select "e1_ICC",
- Input Moving Mask, select "e1_FLAIR_mask"
- Leave all other settings at defaults & Click: Apply. Registration should complete within ~ 40 seconds
- You should see the earlier residual misalignment mostly gone.
- Align Exam 1: T2
- The T2 image is not far in pose from the T1 and also does not have the same skull-contrast issue as the FLAIR, we register directly to the T1 w/o masking
- Open Registration / BRAINSFit module
- To set all parameters from presets, from the ParameterSet menu, select "Xf2_e1_T2-T1_unmasked", else choose settings below:
- Fixed Image: e1_T1, moving image: e1_T2
- Registration Phases: select Include Rigid, "IncludeScaleVersor3D" and Include Affine.
- Output Settings: under SlicerLinear Transform, select "Create New Linear Transform, then select Rename" and rename it to Xf2_e1_T2-T1
- Registration Parameters: increase the Number of Samples field to 200,000
- Leave all other settings at defaults & Click: Apply. Registration should complete within ~ 30 seconds
- Align Exam 2:
- repeat the above steps for exam 2, i.e. align e2_FLAIR and e2_T2 with e2_T1
- the above issue with the FLAIR-T1 residual does not arise for the follow-up exam, hence direct registration (unmasked) is possible
- Registration presets: BRAINSFit see Xf3_ and Xf4_ for FLAIR and T2, respectively

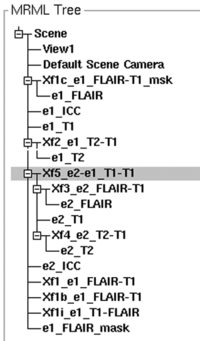
the MRML node tree shows the hierarchy of multiple transfoms.
- Align Exam 2-1:
- finally we align the T1 references of exam 1 and 2, i.e. we align e2_T1 with e1_T1:
- Registration presets: BRAINSFit see Xf5_
- parameters: defaults except increase sample rate to 200,000.
- here we have genuine masks for both images: Control of Mask Processing Tab:
- Control of Mask Processing tab: check "ROI" box,
- Input Fixed Mask, select "e1_ICC",
- Input Moving Mask, select "e2_ICC"
- Leave all other settings at defaults & Click: Apply. Registration should complete within ~ 20 seconds
- Combine Transforms:
- to align all images in a common space, we combine a hierarchy of transforms, i.e. the e2_FLAIR undergoes both the Xf3_e2_FLAIR-T1 and the Xf4_e2-e1: See image on the right for what the final hierarchy should look like.
- right-click on the nested transforms and select Harden Transforms from the pulldown menu. Rename the hardened transforms to indicate the direct alignment with e1_T1.
- Resample
- resample all images with their respective transforms, using the Filtering -> Resample Scalar/Vector/DWI Volume module.
- within the module, select "ws" as interpolation type
- Nonrigid extension
- there is some residual distortion in the alignment of e2_T1 to e1_T1. Optionally one can address this via another separate nonrigid BSpline registration. However combining the Affine with the BSpline is not straightforward (as of v.3.6.1), to do this follow this outline:
- resample e2_T1 according to Xf5 : e2_T1_Xf5
- Perform a BSpline only alignment : Xf6_e2-e1_BSpline that aligns e2_T1_Xf5 with e1_T1. Grid size 3-5.
- Save resulting Xform
- Open Xform file and other saved affine transforms in Text Editor
- Paste the affine portion at the bottom of the BSpline and save under new name.
Registration Results
 unregistered exam 1 & 2
 Exam 2 aligned to Exam 1 (affine only)
 Exam 2 aligned to Exam 1 (affine+BSpline)
 BSpline deformation only of Exam 2