Projects:RegistrationLibrary:RegLib C06
From NAMIC Wiki
Home < Projects:RegistrationLibrary:RegLib C06
updated for v4.1
Back to ARRA main page
Back to Registration main page
Back to Registration Use-case Inventory
Contents
updated for v4.1  Registration Library Case #6: Breast MRI Treatment Assessment

|

|

|
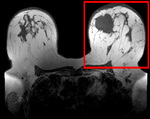
| fixed image/target pre Rx MRI |
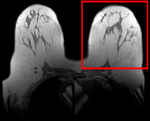
moving image post Rx MRI |
Versions
For the Slicer 3.6 version of this tutorial see here
Modules
- Slicer 3.6.1 recommended modules:
Objective / Background
We seek to align the post-treatment (PostRx) scan with the pre-treatment scan to compare local effects (left side only).
Keywords
MRI, breast cancer, intra-subject, treatment assessment, change detection, non-rigid registration
Download
- Data:
- Presets
- Documentation
Input Data
- reference/fixed : 0.44 x 0.44 x 5 mm , 784 x 784 x 30
- moving: 0.68 x 0.68 x 1.5 mm, 515 x 515 x 93
Methods
- Phase 1: Extract left breast image of PreRx and PostRx scan
- Open the Crop Volume module
- Input volume: "PreRx"
- Input ROI: "Create new annotation ROI"
- ROI visibilité: turn on
- Isotropic output voxel: yes (checkbox)
- Interpolator: "WindowedSinc" (radio button)
- place/drag the color markers visible in the slice views to enclose the left breast only (right side of image)
- click on Crop! button
- go to the Data module
- several new nodes were created: look for the "PreRx_subvolume-scale_1" entry, double click and rename to "PreRx_Left"
- repeat the same for the "PostRx" image
- Save intermediate results.
- Phase 2: MRI Bias field inhomogeneity correction
- Open the N4ITKBiasFieldCorrection module
- Input Image: PreRx_left
- Mask Image: none
- Output Volume: create & rename new: "PreRx_left_n4"
- leave all parameters at defaults
- Apply.
- repeat for the Post_Rx image.
- save intermediate results
- Phase 3: Build masks
- open the Foregroud masking (BRAINS) module (under Segmentation:Specialized)
- Input Image Volume: PreRx_left
- Output Mask: create & rename new: "PreRx_mask"
- Output Image clipped by ROI: none
- Configuration Parameters:
- ROI Auto Dilate Size: 0.1
- defaults for the rest
- Apply
- repeat for Post_Rx_left_n4
- save intermediate results
- Phase 4: Affine pre-Registration
- open the General Registration (BRAINS) module
- Fixed Image Volume: PreRx_left_n4
- Moving Image Volume: PostRx_left_n4
- Output Settings:
- Slicer BSpline Transform": none
- Slicer Linear Transform: create & rename new transform, rename to "Xf1_Affine"
- Output Image Volume: none
- Registration Phases: check boxes for Rigid , Rigid+Scale and Affine
- Main Parameters:
- Number Of Samples: 200,000
- Leave all other settings at default
- Apply
- this should generate a first alignment. To see it you need to:
t and also 2 masks. We already have a DWI mask, so we care not about "DWI_mask_ROIauto", but we will use the T1_mask_ROIauto" output to edit/cleanup and use as mask in the subsequent nonrigid registration
- Phase IV: T1 mask
- open the Editor module
- select "T1_mask_ROIauto" as the volume to edit
- select the Erosion tool and click Apply until all of the segmented skull areas are removed
- select the Brush tool and manually fill in missing areas. Note that this need not be extremely accurate along the edges, since it will serve as a registration mask. To skip this step load the "T1_mask_edit.nrrd" file from the downloaded dataset.
- Phase V: Nonrigid Registration
- open the General Registration (BRAINS) module
- Fixed Image Volume: T1_n4
- Moving Image Volume: DWI_baseline
- Output Settings:
- Slicer BSpline Transform": create new transform, rename to "Xf2_DWI-T1_BSpline"
- Slicer Linear Transform: none
- Output Image Volume: create new volume, rename to "DWI_baseline_Xf2"
- Registration Phases: check boxes for BSpline only
- Main Parameters:
- Number Of Samples: 200,000
- B-Spline Grid Size: 5,5,5
- Mask Option: select ROI button
- ROI Masking input fixed: select " "T1_mask_ROIauto" or "T1_mask_edit" edited in phase III above
- ROI Masking input moving: select "DWI_mask" created in phase I above
- Leave all other settings at default
- click: Apply
Registration Results
Discussion: Registration Challenges
- soft tissue deformations during image acquisition cause large differences in appearance
- the large tumor recession represents a significant pre/post difference in image content that will influence unmasked intensity-driven registration, which becomes a problem for the non-rigid portion of registration, particularly at higher DOF, because the registration will try to "recreate" the tumor area from the postRx image in order to match the content.
- contrast enhancement and pathology and treatment changes cause additional differences in image content
- the surface coils used cause strong differences in intensity inhomogeneity.
- we have strongly anisotropic voxel sizes with much less through-plane resolution
- resolution and FOV change between the two scans
Discussion: Key Strategies
- because of the strong changes in shape and position, we break the problem down and register each breast separately.
- we perform a bias-field correction on both images before registration
- we use the Multires version of RegisterImages for an initial affine alignment
- the nonlinear portion is then addressed with a BSpline or DiffeomorphicDemons algorithm
- because accuracy is more important than speed here, we increase the sampling rate (i.e. the number of points sampled for the BSpline registration)


