Difference between revisions of "Projects:RegistrationLibrary:RegLib C14"
From NAMIC Wiki
(Created page with 'Back to ARRA main page <br> Back to Registration main page <br> [[Projects:RegistrationDocumentation:UseCaseInv…') |
m (Text replacement - "http://www.slicer.org/slicerWiki/index.php/" to "https://www.slicer.org/wiki/") |
||
| (31 intermediate revisions by 2 users not shown) | |||
| Line 3: | Line 3: | ||
[[Projects:RegistrationDocumentation:UseCaseInventory|Back to Registration Use-case Inventory]] <br> | [[Projects:RegistrationDocumentation:UseCaseInventory|Back to Registration Use-case Inventory]] <br> | ||
| − | ==Slicer Registration | + | ==<small>v3.6.1</small> [[Image:Slicer3-6Announcement-v1.png|150px]] Slicer Registration Library Case #14: <br>Intra-subject Brain PET-MRI with MRI orientation adjustment == |
| − | + | === Input === | |
| − | {| style="color:#bbbbbb | + | {| style="color:#bbbbbb; " cellpadding="10" cellspacing="0" border="0" |
| − | |[[Image: | + | |[[Image:RegLib_C14_Thumb_MRI.png|100px|lleft|this is the fixed reference image. All images are aligned into this space]] |
| − | |[[Image: | + | |[[Image:RegArrow_Affine.png|100px|lleft]] |
| − | |[[Image: | + | |[[Image:RegLib_C14_Thumb_PET.png|100px|lleft| this indicates the moving image that determines the registration transform]] |
| − | |||
| − | |||
| − | |||
| − | |||
| − | |||
| − | |||
| − | |||
|- | |- | ||
| − | | | + | |fixed image/target |
| | | | ||
| − | | | + | |moving image |
|} | |} | ||
| − | + | ||
| − | |||
=== Keywords === | === Keywords === | ||
PET-MRI, brain, intra-subject, image fusion | PET-MRI, brain, intra-subject, image fusion | ||
===Input Data=== | ===Input Data=== | ||
| − | * | + | *reference/fixed : baseline MRI:coronal T1w , 256 x 256 x 79, 0.86 x 0.86 x 2.5 mm |
| − | *[[ | + | *moving: PET: axial, fluorodeoxyglucose, 128 x 128 x 35, 4.29 x 4.29 x 4.25 mm |
| + | |||
| + | === Modules === | ||
| + | *'''Slicer 3.6.1 recommended modules: [https://www.slicer.org/wiki/Modules:BRAINSFit BrainsFit], [https://www.slicer.org/wiki/Modules:RegisterImages-Documentation-3.6 Expert Automated Registration]''' | ||
| + | |||
| + | ===Download === | ||
| + | *Data: | ||
| + | *[[Media:RegLib_C14_Data.zip|download example '''data''' set <small> (Data+intermediate results+presets, zip file 17 MB) </small>]] | ||
| + | *Presets | ||
| + | **[[Media:RegLib_C14_Presets_BFit.mrml|download registration parameter '''presets (BRAINSfit)''' <small> (Data only, zip file 8 kB) </small>]] | ||
| + | **[[Media:RegLib_C14_RegistrationPresets.mrml|download registration parameter '''presets (Slicer v3.5)''' <small> (Data only, zip file 20 kB) </small>]] | ||
| + | **[[Projects:RegistrationDocumentation:ParameterPresetsTutorial|Link to User Guide: How to Load/Save Registration Parameter Presets]] | ||
| + | *Documentation | ||
| + | **'''[[Media:RegLib_C14_Tutorial.ppt|download step-by-step tutorial <small> (PowerPoint 1.2 MB) </small>]]''' | ||
| + | **'''[[Media:RegLib_C14_Tutorial.pdf|download step-by-step tutorial <small> (PDF MB) </small>]]''' | ||
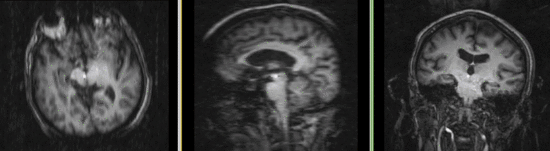
=== Registration Results=== | === Registration Results=== | ||
| − | <gallery widths="550px" heights="250px" perrow=" | + | <gallery widths="550px" heights="250px" perrow="1"> |
| − | + | Image:RegLib_C14_PET-MRI_MRIraw.png|uncorrected MRI as read from DICOM. Note that image is distorted due to incomplete header information. See [[Projects:RegistrationDocumentation:RegLib_14_PETMRI1#Discussion:_Registration_Challenges|the registration challenges section below]]. | |
| − | Image: | + | Image:RegLib_C14_PET-MRI_unregistered.png|unregistered MRI & PET images. |
| + | Image:RegLib_C14_PET-MRI_Result_AnimGif.gif|registered MRI & PET images. | ||
</gallery> | </gallery> | ||
| − | === | + | === Methods === |
| − | *''' | + | *'''Phase I: fix distortion from incorrect header info''' |
| − | *''' | + | # |
| − | + | *'''Phase II: Registration (BRAINSfit) | |
| − | + | #if skipping Phase I: Load example dataset via OpenScene... | |
| − | + | #Open ''Registration / BRAINSFit'' module | |
| − | + | ##To set all parameters from presets, from the ''ParameterSet'' menu, select "Xf2_BFit" else choose settings below: | |
| + | ##Fixed Image:RegLib_C14_MRI_fixed, moving image: RegLib_C14_PET | ||
| + | ##Registration Phases: check boxes for "Initialize with MomensAlign", ''Include Rigid'', "Include ScaleVersor3D" and ''Include Affine'' | ||
| + | ##Output Settings: under SlicerLinear Transform, select "Create New Linear Transform'', then select ''Rename" and rename it to ''Xf2_BFit'' | ||
| + | ##Registration Parameters: change the ''Number of Samples'' field to 200,000 | ||
| + | ##Leave all other settings at defaults | ||
| + | ##Click: ''Apply'' ; Registration should complete within ~ 30 seconds | ||
| + | ##Go back to the ''Data'' module: you should see the RegLib_C14_PET image moved under the newly created transform | ||
| + | #Apply Transform | ||
| + | ##To apply the registration transform to the PET image, select it in the ''Data'' module, and from right-click menu select ''Harden Transform''. Note that this will overwrite the original unregistered image (in memory) and replace it with the resampled one. Not also that the resolution will not change. If you wish the registered PET to be in the same resolution as the reference MRI, use the resample module below: | ||
| + | ##Go to ''Filtering / Resample Scalar/Vector/DWI Volume''' | ||
| + | ###Input: RegLib_C14_PET, Reference: RegLib_C14_MRI_fixed | ||
| + | ###Output: "create new Volume", rename to "RegLib_C14_PET_reg" or similar | ||
| + | ###Transform Parameters: Transform Node: 'Xf2_BFit'' | ||
| + | ###Leave all other settings at default and click: ''Apply'' | ||
| + | #Choose ''File/Save'' to save results. | ||
| + | <br> | ||
<!-- | <!-- | ||
| Line 51: | Line 74: | ||
*the original DICOM files of the MRI have image orientation data stripped. Hence the volume does not load in correct orientation and needs to be adjusted | *the original DICOM files of the MRI have image orientation data stripped. Hence the volume does not load in correct orientation and needs to be adjusted | ||
*the two series have different voxel sizes | *the two series have different voxel sizes | ||
| − | *image content | + | *image content and resolution in PET is low |
| + | |||
=== Discussion: Key Strategies === | === Discussion: Key Strategies === | ||
*we use the Volumes module to adjust the MRI voxel size based on the info in the DICOM header | *we use the Volumes module to adjust the MRI voxel size based on the info in the DICOM header | ||
*we use the Transforms module to reorient the MRI along the proper axes | *we use the Transforms module to reorient the MRI along the proper axes | ||
| − | * | + | **the aspect ratio we correct via the "Volumes" module. The correct slice thickness we obtain from the DICOM header via the browser displayed when selecting "Add Volume" |
| + | **the "Transforms" module is used to correct orientation. We enter manual rotations of 90 and 180 degrees around the LR (left-right) and IS (inferior-superior) axes, respectively | ||
| + | **the corrected MRI volume is resampled in the Data module via "harden transforms" | ||
| + | *The ''BRAINSfit'' or ''Expert Automated Registration'' modules are recommended to automatically align the PET with the MRI. We choose mutual information ("MI") as the criterion and a 5% sampling rate. We request an affine transform to correct for small distortion differences between the PET and the MRI | ||
| + | |||
| + | === Acknowledgments === | ||
| + | Our thanks to the [http://www.uwo.ca '''University of Western Ontario'''] for providing this example case. | ||
Latest revision as of 17:38, 10 July 2017
Home < Projects:RegistrationLibrary:RegLib C14Back to ARRA main page
Back to Registration main page
Back to Registration Use-case Inventory
Contents
v3.6.1  Slicer Registration Library Case #14:
Intra-subject Brain PET-MRI with MRI orientation adjustment

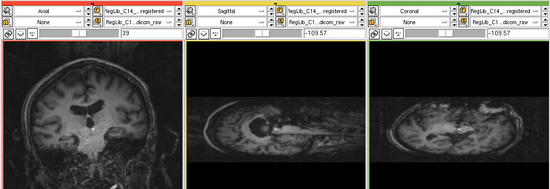
Input

|

|

|
| fixed image/target | moving image |
Keywords
PET-MRI, brain, intra-subject, image fusion
Input Data
- reference/fixed : baseline MRI:coronal T1w , 256 x 256 x 79, 0.86 x 0.86 x 2.5 mm
- moving: PET: axial, fluorodeoxyglucose, 128 x 128 x 35, 4.29 x 4.29 x 4.25 mm
Modules
- Slicer 3.6.1 recommended modules: BrainsFit, Expert Automated Registration
Download
- Data:
- download example data set (Data+intermediate results+presets, zip file 17 MB)
- Presets
- Documentation
Registration Results
uncorrected MRI as read from DICOM. Note that image is distorted due to incomplete header information. See the registration challenges section below.
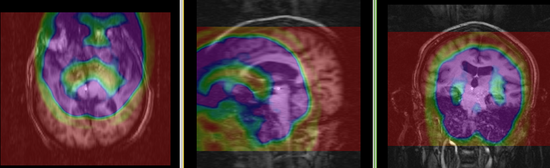
unregistered MRI & PET images.
registered MRI & PET images.


Methods
- Phase I: fix distortion from incorrect header info
- Phase II: Registration (BRAINSfit)
- if skipping Phase I: Load example dataset via OpenScene...
- Open Registration / BRAINSFit module
- To set all parameters from presets, from the ParameterSet menu, select "Xf2_BFit" else choose settings below:
- Fixed Image:RegLib_C14_MRI_fixed, moving image: RegLib_C14_PET
- Registration Phases: check boxes for "Initialize with MomensAlign", Include Rigid, "Include ScaleVersor3D" and Include Affine
- Output Settings: under SlicerLinear Transform, select "Create New Linear Transform, then select Rename" and rename it to Xf2_BFit
- Registration Parameters: change the Number of Samples field to 200,000
- Leave all other settings at defaults
- Click: Apply ; Registration should complete within ~ 30 seconds
- Go back to the Data module: you should see the RegLib_C14_PET image moved under the newly created transform
- Apply Transform
- To apply the registration transform to the PET image, select it in the Data module, and from right-click menu select Harden Transform. Note that this will overwrite the original unregistered image (in memory) and replace it with the resampled one. Not also that the resolution will not change. If you wish the registered PET to be in the same resolution as the reference MRI, use the resample module below:
- Go to Filtering / Resample Scalar/Vector/DWI Volume'
- Input: RegLib_C14_PET, Reference: RegLib_C14_MRI_fixed
- Output: "create new Volume", rename to "RegLib_C14_PET_reg" or similar
- Transform Parameters: Transform Node: 'Xf2_BFit
- Leave all other settings at default and click: Apply
- Choose File/Save to save results.
Discussion: Registration Challenges
- the original DICOM files of the MRI have image orientation data stripped. Hence the volume does not load in correct orientation and needs to be adjusted
- the two series have different voxel sizes
- image content and resolution in PET is low
Discussion: Key Strategies
- we use the Volumes module to adjust the MRI voxel size based on the info in the DICOM header
- we use the Transforms module to reorient the MRI along the proper axes
- the aspect ratio we correct via the "Volumes" module. The correct slice thickness we obtain from the DICOM header via the browser displayed when selecting "Add Volume"
- the "Transforms" module is used to correct orientation. We enter manual rotations of 90 and 180 degrees around the LR (left-right) and IS (inferior-superior) axes, respectively
- the corrected MRI volume is resampled in the Data module via "harden transforms"
- The BRAINSfit or Expert Automated Registration modules are recommended to automatically align the PET with the MRI. We choose mutual information ("MI") as the criterion and a 5% sampling rate. We request an affine transform to correct for small distortion differences between the PET and the MRI
Acknowledgments
Our thanks to the University of Western Ontario for providing this example case.