Projects:RegistrationLibrary:RegLib C08
Back to ARRA main page
Back to Registration main page
Back to Registration Use-case Inventory
Contents
v3.6.1  Slicer Registration Library Case #08: Intra-subject whole-body PET-CT

Input

|

|

|

|

|
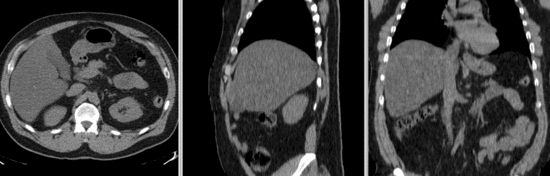
| fixed image/target | fixed image/target | moving image | moving image |
Modules
- Slicer 3.6.1 recommended modules: Expert Automated Registration + Fast Nonrigid BSpline or BrainsFit,
Objective / Background
Change assessment.
Keywords
PET-CT, whole-body, change assessment
Input Data
- reference/fixed : baseline CT: 0.97 x 0.97 x 3.27 mm , 512 x 512 x 267; PET: 4.7 x 4.7 x 3.3 mm , 128 x 128 x 267
- moving: CT: 0.98 x 0.98 x 5, 512 x 512 x 195; PET: 4.1 x 4.1 x 5 mm, 168 x 168 x 195
Registration Results

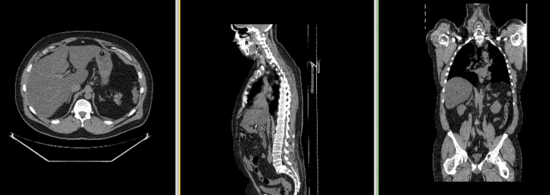
Original unregistered CT images.
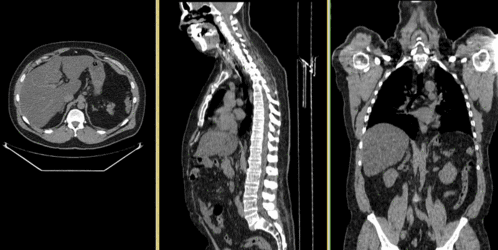
Automated Affine alignment (RegisterImages) removes global differences. Differences due to posture and breathing remain.
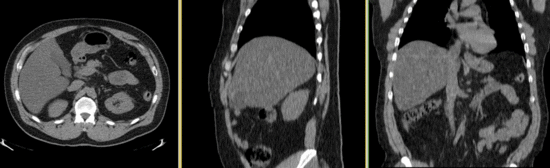
BSpline registration of full volumes achieves better alignment in the abdominal and thoracic region of interest. But the solution is suboptimal because the algorithm is distracted by the strong differences in head position.Rather than trying to address this with more DOF, we calculate a BSpline transform based on croped images including only the main region of interest.
After BSpline registration of cropped volumes. The registering of thoracic and abdominal regions only produces good results. We still apply this transform to the uncropped image.
Affine + BSpline registration obtained from BRAINSfit module
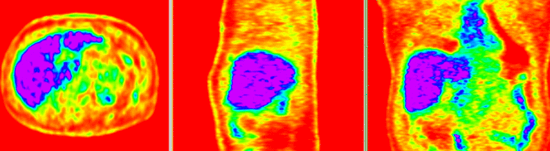
PET image of second timepoint aligned with first. Obtained by resampling the original PET with the obtained BSpline transform.


Download
- Data
- Presets
- Documentation
Procedure
- Phase I: Preprocessing: center
- the two volume sets have different origins specified in their header files. We reset both to obtain a rough alignment:
- Go to Volumes module and select the Info tab
- From Active Volume menu, select s1_CT; then click the Center Volume button
- repeat for s1_PET, s2_CT etc.
- Phase II: Preprocessing: crop
- Crop to region of interest: to avoid bias from the strong differences in head positiion, we reduce the effective FOV do the abdominal region of interest
- Go to the “Extract Subvolume ROI” module.
- click in respective slice view (axial, sagittal, coronal) to se the boundaries. When done select
- We clip both s1_CT and s2_CT between the 5th lumbar and the 5th thoracic vertebrae. For a separate tutorial on how to use the Subvolume module, see the slicer training compendium
- To skip this step, load the ready-made cropped volumes from the example dataset: s1_CT_crop , s2_CT_crop.
- Phase III: Affine Registration (Expert Automated Module)
- Open Expert Automated Registration Module
- Fixed Image: s1_CT
- Moving Image: s2_CT
- Save Transform: create new, rename to "Xf1_s2-s1_Affine"
- if running on uncropped/uncentered: check Initialization: Centers of Mass
- Registration: Pipeline Affine Metric: MattesMI
- Expected offset magnitude: 50
- Expected rotation,scale,skew magnitude: leave at default
- “Advanced Affine Registration Parameters” Tab: Affine Max Iterations: 10, Affine sampling ratio: 0.02
- Click: Apply
- Go to Data module and drag the moving volume inside the newly created transform to see the result
- Phase IV: Non-rigid Registration (Fast Nonrigid BSpline Module)
- Open Fast Nonrigid BSpline module
- Fixed Image: s1_CT_crop
- Moving Image: s2_CT_crop
- Initial Transform: Xform_Aff0_Init
- Output transform: create new, rename to “Xform_BSpl2”
- Output Volume: create new, rename to “s2_CT_BSpl2”
- Iterations: 120; Grid Size: 9; Histogram Bins: 50
- Spatial Samples: 150000
- Phase III-IV alternative: BRAINSFit: Affine + BSpline
- Go to BRAINSFit registration module
- select parameter presets from pulldown menu: 'Xf2_S2-s1_cropped or set the parameters below:
- Fixed Image: s1_CT_crop
- Moving Image: s2_CT_crop
- check: include Rigid, include ScaleVersor3D, include Affine, include BSpline
- Output: Slicer BSpline Transform: create new, rename to "Xf2_s2c-s1c_BFit"
- Output Image Volume: create new, rename to "S2_CT_crop_Xf2"
- Output Image Pixel Type: "short"
- Registration Parameters: Number of grid subdivisions: 3,3,3; leave rest a default settings
- Click: Apply
for more details see the tutorial under Downloads
Discussion: Registration Challenges
- accuracy is the critical criterion here. We need the registration error (residual misalignment) to be smaller than the change we want to measure/detect. Agreement on what constitutes good alignment can therefore vary greatly.
- the two series have different voxel sizes
- because of the large FOV we have strong non-rigid deformations from differences in patient/limb positions etc.
- images are large volumes (>100 MB total)
- image content reaches border of image on two sides
- 2 images pairs have to be aligned, i.e. the calculated transform must be applied to the second (PET) image.
Discussion: Key Strategies
- to calculate the transform, we use the images with the most accurate geometric representation and the smallest expected change, i.e. we align the follow-up CT to the baseline CT and then apply the transforms to the PET image.
- because of the non-rigid differences due to posture and breathing we will need to apply a 2-step registration with an affine alignment followed by a BSpline.
- the strong differences in head position is likely to distract the registration and lead to suboptimal results. Hence we produce a cropped version of the two CT images to calculate the BSpline transform.
- the two images are far apart initially, we will need some form of initialization. We will try an automated alignment first. If this fails, we do a 2-step process with manual initial alignment, followed by automated affine.
- because accuracy is more important than speed here, we increase the iterations and sampling rates. Note however the large image size, which makes comparable sampling % still large compared to other datasets.
- the two images have identical contrast, hence we could consider "sharper" cost functions, such as NormCorr or MeanSqrd. However, since these are not (yet) available for the BSpline registration.